# ⚪️ Strapi への深い理解
# project structure (opens new window)
以下の構成は、
strapi newで作成されるプロジェクトの構成です。
. # root of the application
├──── .strapi # auto-generated folder — do not update manually
│     └──── client # files used by bundlers to render the application
│           ├ index.html
│           └ app.js
├──── .tmp
├──── build # build of the admin panel
├──── config # API configurations
│     ├ api.js
│     ├ admin.js
│     ├ cron-tasks.js
│     ├ database.js
│     ├ middlewares.js
│     ├ plugins.js
│     └ server.js
├──── database
│     └──── migrations
├──── node_modules # npm packages used by the project
├──── public # files accessible to the outside world
│     └──── uploads
├──── src
│     ├──── admin # admin customization files
│           ├──── extensions # files to extend the admin panel
│     │     ├ app.js
│     │     └ webpack.config.js
│     ├──── api # business logic of the project split into subfolders per API
│     │     └──── (api-name)
│     │           ├──── content-types
│     │           │     └──── (content-type-name)
│     │           │           └ lifecycles.js
│     │           │           └ schema.json
│     │           ├──── controllers
│     │           ├──── middlewares
│     │           ├──── policies
│     │           ├──── routes
│     │           ├──── services
│     │           └ index.js
│     ├──── components
│     │     └──── (category-name)
│     │           ├ (componentA).json
│     │           └ (componentB).json
│     ├──── extensions # files to extend installed plugins
│     │     └──── (plugin-to-be-extended)
│     │           ├──── content-types
│     │           │     └──── (content-type-name)
│     │           │           └ schema.json
│     │           └ strapi-server.js
│     ├──── middlewares
│     │     └──── (middleware-name).js
│     ├──── plugins # local plugins files
│     │     └──── (plugin-name)
│     │           ├──── admin
│     │           │     └──── src
│     │           │           └ index.js
│     │           ├──── server
│     │           │     ├──── content-types
│     │           │     ├──── controllers
│     │           │     └──── policies
│     │           ├ package.json
│     │           ├ strapi-admin.js
│     │           └ strapi-server.js
│     ├─── policies
│     └ index.js # include register(), bootstrap() and destroy() functions
├ .env
└ package.json
Understand the project structure of a Strapi project.
Project Root: The top-level directory of the Strapi application, containing all the files and subdirectories needed for the application to run.
.strapiDirectory: This is an auto-generated folder. It's created and managed by Strapi itself. You shouldn't manually update files in this directory as they are managed by the Strapi framework. It typically includes client-side files used by bundlers to render the application.index.htmlandapp.jsare examples of files in this directory, which are key to rendering the Strapi admin panel in a web browser.
.tmpDirectory: A temporary directory used by Strapi during runtime for storing temporary files.buildDirectory: This is where the built version of the admin panel resides. The "build" process involves compiling and bundling all the necessary files (like JavaScript, CSS, HTML) into a format suitable for deployment. This is done so that the admin panel can be served efficiently in a production environment.- The "build" process is usually done after development when you're ready to deploy your application. It optimizes the application for better performance in a production environment.
# API (opens new window)
# headless CMS とは?
Headless CMS, like Strapi, represents a significant shift in how content management systems operate, particularly in the relationship between the front-end and the back-end. Let's break down what it means and how it's particularly beneficial for a React JavaScript environment:
Traditional vs. Headless CMS:
- Traditional CMS: Systems like WordPress tightly couple the front-end (what you see) and the back-end (where content is stored and managed). This means the way content is created, stored, and displayed is predefined and linked. Customizing the front-end or integrating with different technologies can be challenging.
- Headless CMS: Strapi, as a headless CMS, decouples the front-end and the back-end. It provides only the back-end (headless) part, where content is stored and managed via an API. The front-end part (the "head") is entirely separate and can be built using any technology – like React in your case.
API-Driven Approach:
- In a headless CMS, content is delivered through APIs, typically RESTful or GraphQL. This approach offers greater flexibility in how content is retrieved and displayed. A front-end developer can query the API to fetch content and display it using React or any other front-end framework.
Benefits for Front-End Developers:
- Flexibility: You can use your preferred front-end technology (React, Angular, Vue.js, etc.) to build your user interface.
- Customization: Since the front-end is separate, you have complete control over the user experience and can build custom UIs without the constraints of traditional CMS themes or templates.
- Scalability: APIs make it easier to scale your application. You can develop new features or change the front-end without altering the back-end.
- Omnichannel Content Delivery: Content can be used across different platforms – web, mobile apps, IoT devices, etc., without needing to adjust the back-end for each case.
Why "Headless" for React Development:
- React is a powerful library for building user interfaces. Pairing React with a headless CMS like Strapi allows you to create dynamic, interactive web applications with content that's easy to manage and update.
- You can fetch data from the Strapi API using AJAX calls (with
fetch,axios, or any other HTTP client) and then render this data using React components. This setup offers a modern, efficient way to build web applications.
Strapi 的「無頭」性質意味著它提供後端功能(例如透過 API 進行內容儲存、管理和交付),而無需規定前端應如何建置或呈現。這種分離允許前端開發人員利用 React 等現代框架的強大功能來建立豐富的互動式使用者介面,同時仍受益於 CMS 強大的內容管理功能。
# Content Type Builder (opens new window)
The Content Type Builder in Strapi is a powerful feature that enables you to quickly generate API endpoints for managing data through CRUD (Create, Read, Update, Delete) operations. Here's a summary of its functionalities and an example to illustrate its use:
# Understanding Content Type Builder:
Purpose:
- Enables the creation of Content Types (data structures) in Strapi.
- Facilitates the definition and customization of fields for these Content Types.
Functionality:
- Data Structure Creation: You can define new Content Types (akin to tables in a database) directly within Strapi's admin panel. This includes specifying the fields and data types.
- API Generation: Once a Content Type is created, Strapi automatically generates RESTful or GraphQL API endpoints for it. This means you can perform CRUD operations on the data associated with this Content Type.
- Customization: The fields of a Content Type can be tailored to fit the data requirements of your application. You can choose from various field types like text, number, media, relational fields (to establish relationships between different Content Types), and more.
User Interface:
- The Content Type Builder offers a user-friendly interface within the Strapi admin panel for designing and modifying Content Types without writing any code.
# Example Use Case:
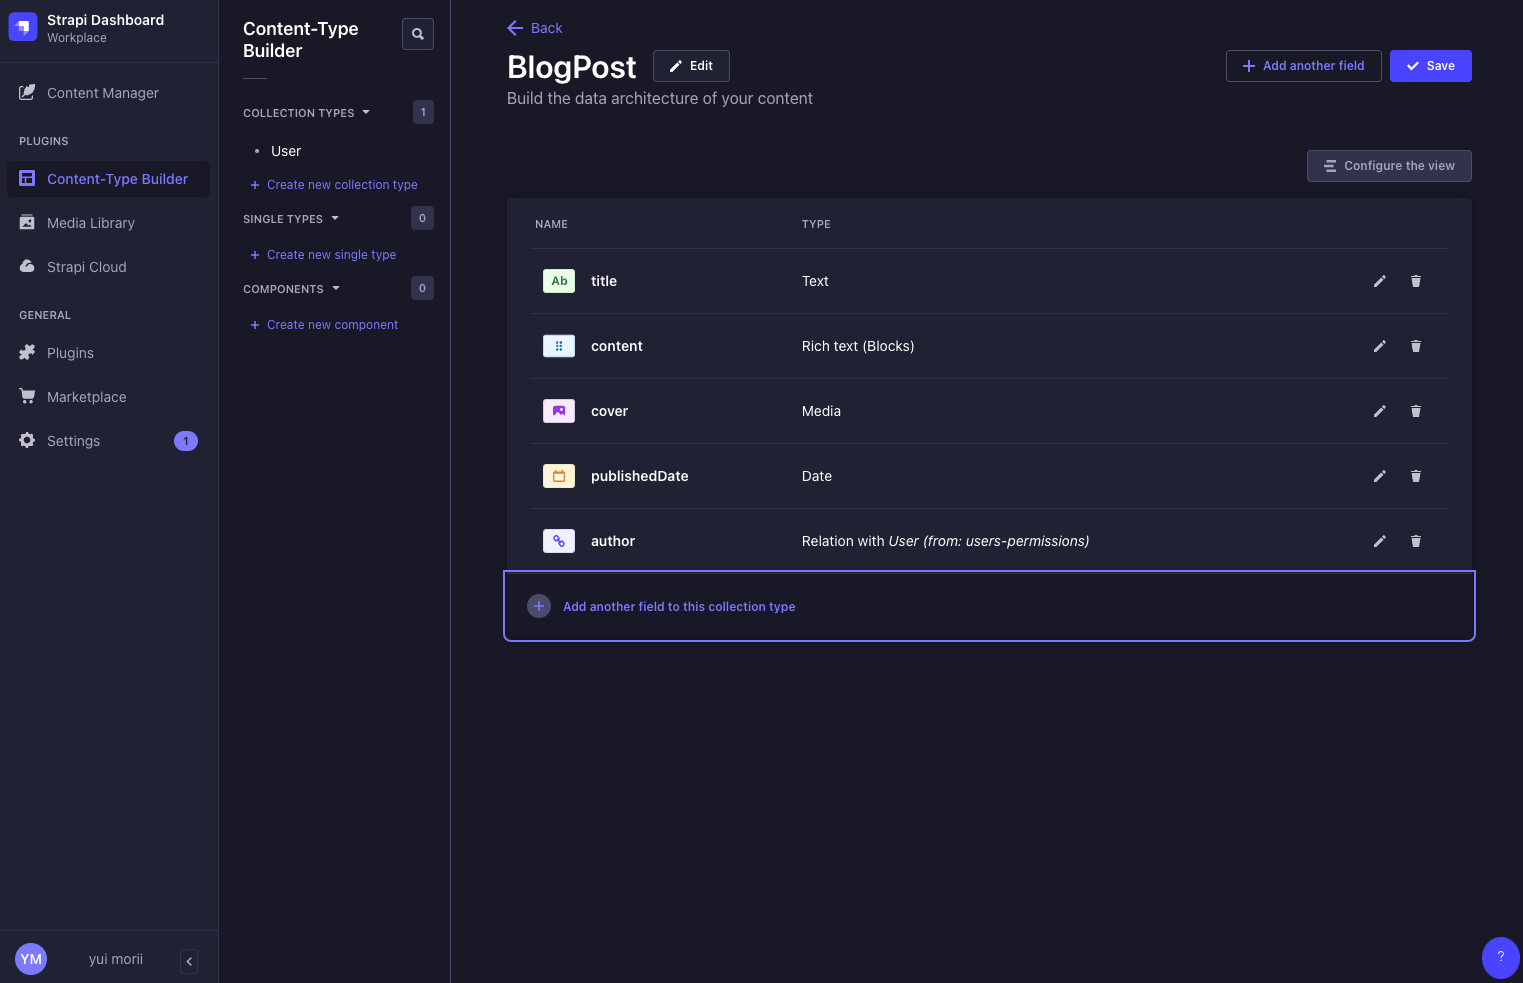
- Creating a Blog Post Content Type:
- Objective: To create a Content Type for managing blog posts.
- Steps:
- Access the Content Type Builder in the Strapi admin panel.
- Create a new Content Type named
BlogPost. - Define fields such as
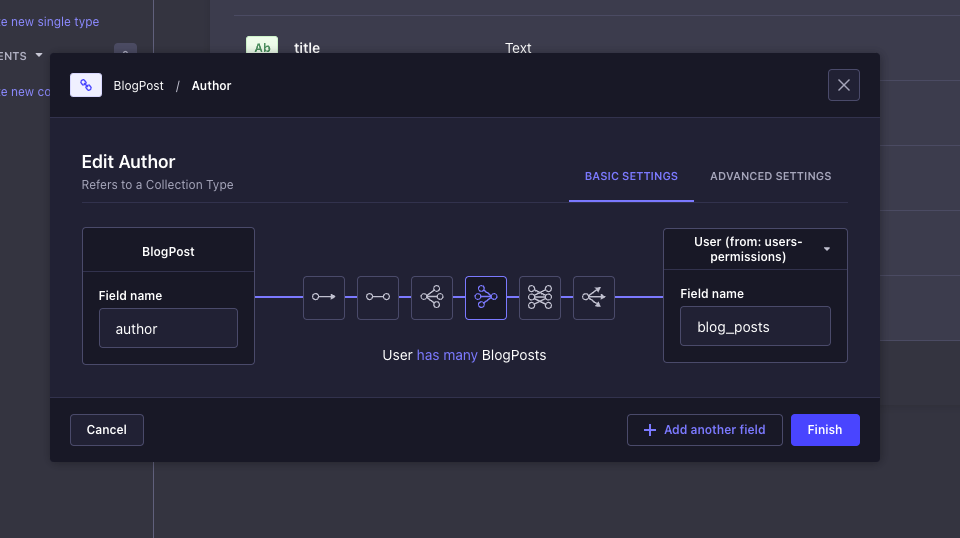
title(text type),content(rich text type),publishedDate(date type), andauthor(relational field linking to aUserContent Type). - Save the Content Type. Strapi then generates API endpoints for
BlogPost.
- Outcome: You can now use the generated API endpoints to create, retrieve, update, or delete blog posts in your application.
# Conclusion:
The Content Type Builder in Strapi streamlines the process of creating data structures and corresponding APIs, making it an ideal tool for developers looking to build and manage content-driven applications efficiently. Its user-friendly interface and customization options allow for a great degree of flexibility in defining the data model according to the specific needs of your application.
The Content Type Builder in Strapi is a powerful feature that enables you to quickly generate API endpoints for managing data through CRUD (Create, Read, Update, Delete) operations. Here's a summary of its functionalities and an example to illustrate its use:
# Understanding Content Type Builder:
Purpose:
- Enables the creation of Content Types (data structures) in Strapi.
- Facilitates the definition and customization of fields for these Content Types.
Functionality:
- Data Structure Creation: You can define new Content Types (akin to tables in a database) directly within Strapi's admin panel. This includes specifying the fields and data types.
- API Generation: Once a Content Type is created, Strapi automatically generates RESTful or GraphQL API endpoints for it. This means you can perform CRUD operations on the data associated with this Content Type.
- Customization: The fields of a Content Type can be tailored to fit the data requirements of your application. You can choose from various field types like text, number, media, relational fields (to establish relationships between different Content Types), and more.
User Interface:
- The Content Type Builder offers a user-friendly interface within the Strapi admin panel for designing and modifying Content Types without writing any code.
# Example Use Case:

- Creating a Blog Post Content Type:
- Objective: To create a Content Type for managing blog posts.
- Steps:
- Access the Content Type Builder in the Strapi admin panel.
- Create a new Content Type named
BlogPost. - Define fields such as
title(text type),content(rich text type),publishedDate(date type), andauthor(relational field linking to aUserContent Type).
- Save the Content Type. Strapi then generates API endpoints for
BlogPost.
- Outcome: You can now use the generated API endpoints to create, retrieve, update, or delete blog posts in your application.
# Content Manager (opens new window)
← ⚪️ graphql ⚪️ →